Facials - Products of your choice
Facials - More Procedures using face masks
face masks - basic facial and (some) facial massage steps.
Here are some of the procedures for facials and for facial massage, which I hope you will find useful. In any case of facial massage please remove any contact lenses.
The Basic Facial
1. Cleanse your skin with your usual cleanser applying in circular motions from your neck upwards. Then either tissue or wash off, depending on your skin type (see previous articles).
2. If you are having a bath, do so now so that the steam can open up your pores making it more receptive to the mask treatment. If not, fill a bowl with hot water (not boiling). Add a couple of blended lavender/eucalyptus essential oil (whichever one suits your mood or skin). Alternatively try adding a chamomile tea bag. Place your head above the bowl of water, with a tea towel over your head, and then breathe deeply for a few minutes.
3. The next step is to exfoliate your skin. With your exfoliator gently massage into your face in circular movements. Either tissue or wash off the exfoliator. (See further down)
4. Next comes the mask. Make sure that your skin is dry if you are using a clay-based mask, otherwise it will not dry. Leave on for 5-10 minutes - pop a couple of slices of cucumber or cold tea bags over your eyes whilst you are waiting for the mask to work. Then wash off the mask.
5. Now massage your skin with either your moisturiser or make up your own oil-based massage cream. For this, get some wheat germ, grape or any other carrier oil, blend in a couple of essential oils to suit your skin type (Lavender is always good, Tea Tree for oily skin or Neroli for sensitive skin). Make sure you only put a couple of drops of essential oil in. When done, shake the bottle. Apply a small amount to the palms of your hands then rub together to warm the product. In sweeping motions apply the product from the neck up, then massage in with small circular movements.
6. Finally apply an eye cream. Dab this on with your ring finger. Make sure you do not apply any pressure or drag the skin around your eye.
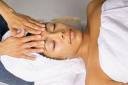
The Basic Face Massage Steps
1. Cup hands around the head, with thumbs resting on the forehead and fingertips at the temples. Smooth out the forehead in strips-starting along the eyebrows, working up toward the hairline.
2. Press between the eyebrows with your thumbs. Repeat, moving up the centre of the forehead to the hairline.
3. Massage temples, using circular motion with fingers. Continue circles down along the jawbone to the chin.
4. Using your fingertips, draw a line under the cheekbone and out to the temples. Repeat, taking the line lower down the cheek each time.
5. Use the fingertips to draw a big moustache shape from the upper lip out to the temples, and circle the temples one more time.
6. Press softly around the upper bone of the eye sockets, starting from the bridge of the nose, out to the corner of the eye. Repeat, this time working carefully around the eye socket under the eyes.
7. Gently massage the ears between your thumbs and fingers, starting at the earlobe and moving around and up to the top of the ear.
8. Pull ears very gently, again starting with the lobe and moving gradually to the top of the ear.
9. Cup hands and rest them over the eyes(it's best to warn your partner before you do this). Ask your partner to breathe in and out deeply several times. Release the hands.
The "Shiseido" Facial Massage
Step 1: Forehead - Starting at the centre of the forehead, gradually move fingers across the brow in 6 complete circular motions. Repeat 3 times. Finish by gently pressing the pressure points at the temples for 3 counts. To locate your pressure points, feel for slight depressions between the bones at the temples. Pressure applied should feel pleasant and invigorating, never painful.
Step 2: Nose - Slide fingers downward along the sides of your nose, starting from the inner hollow of the eye. Use left hand to massage the right side of the nose, and the right hand for the left side. Repeat 3 times on each side of nose.
Step 3: Nostrils - Circle back and forth around nostrils, applying extra pressure during the upward stroke. Repeat 6 times.
Step 4: Mouth - Massage along the lower lip, moving outward and upward to lift the corners of the mouth. Release gently. Repeat 3 times.
Step 5: Cheeks - Massage outward from the chin to the earlobe, in 6 circular motions, focusing on the jawline. Glide fingers to corners of the mouth and massage up to the middle of the ear. Glide again to the nostrils and massage to the temples. Glide back to chin and repeat all steps 3 times. Finish by pressing the pressure points at your temples.
Step 6: Eyes - First, press the pressure points just under brow bone below the inner eyebrows and count to 3. Then glide fingers under brow, around and under the eyes, and back to the starting point in 6 counts. Repeat entire procedure 3 times, moving gently over the eyelid to press at temples on the final count.
Step 7: Neck - Helps ease tension and stiffness at the nape. Using the palms of your hands, massage your neck by gently stroking upward from the collar bone to the base of the chin. Alternate hands as you move from the centre to either side with 6 strokes out, then 6 strokes back. Glide lightly at the centre of the neck and increase pressure as you move outward.
Step 8: Chin - Grasp your chin between your index and middle finger at the jaw, and gently slide your fingers across the length of your jaw, creating a scissor-like motion. Bend index finger and place it under the jaw. Using the side of the index finger and pad of the thumb, massage back to right ear. Repeat with left hand. Repeat entire procedure 6 times.